1982 BMW 320i Rear Wheel Bearing Replacement

Success! I used a big Model No. 1 Dake arbor press. I wouldn’t recommend using anything else to press the new bearings and bushings in. You’ll need an extra set of hands with the press to hold the semi-trailing arm in place while you press. (FYI: a trailing arm is perpendicular to the drive shaft. A semi-trailing arm is at an angle from the drive shaft. The more you know!) Here’s my DIY:

0. Chock front tires, jack up rear end of car, install jack stands unscrew the four lug bolts and remove the tire you’re working on.

1. I unscrewed the 5mm hex nut with an allen wrench and then removed the hub. I sprayed everything down with brake cleaner to minimize the toxic dust, letting the runoff drain onto a drain pan.
1.jpg

2. I then unfastened the CV Joint bolts from the trailing arm splined axle using an electric impact wrench and rolled the CV joint out of the way, propping it up and out of the way.

IMG_7743.JPG

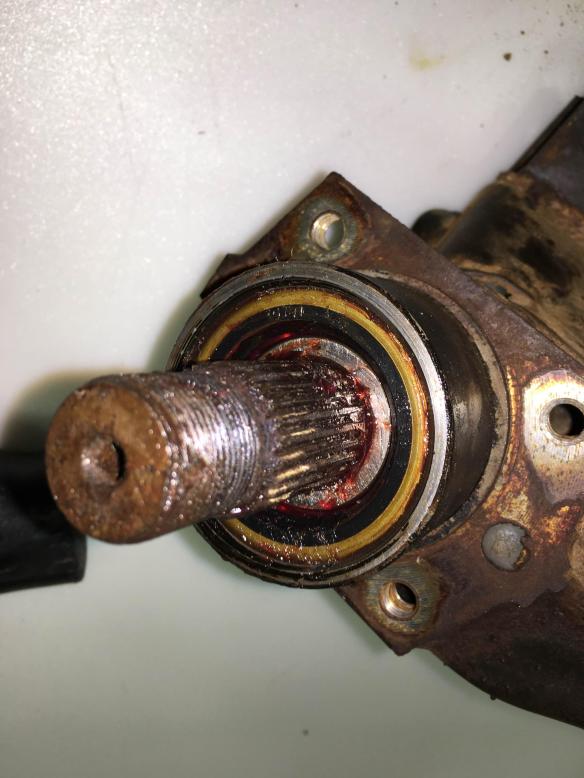
3. I then removed the cotter pin from and put blaster oil on the castellated nut that holds the wheel plate to the splined axle. I used an air impact wrench with a 36mm socket to then remove the castellated nut. It came off easily with the impact.

4. I firmly but gently tapped the edges of the wheel plate with the flat edge of a ball peen hammer and was able to work the wheel plate off the splined axle. I took a sledge hammer and precisely whacked the splined axle and drove it out the back of the trailing arm. The dust cap came out with the splined axle in pristine condition. I didn’t bother trying to replace it. It looked fine and stayed connected to the splined axle. So considering the lead time on getting those from Germany, if it ain’t broke…

5. I unclipped the bottom spring on the drum brakes and then unhooked the parking brake line and fed it out through the back of the brake shield. I unhooked the parking brake line from the little hole where it attaches to the trailing arm. Then I pulled the drum brakes apart being careful not to tear the two rubber boots at the top and removed the drum brakes.

6. I unscrewed the brake line from where it attaches on top of the trailing arm and let it drip into a drain pan. My rear brake lines are not OEM I think. The bolts that attached were a 12mm on the rubber side and a 7/16 on the metal line side. I then unscrewed the four bolts of the brake shield, removed it and set it aside.

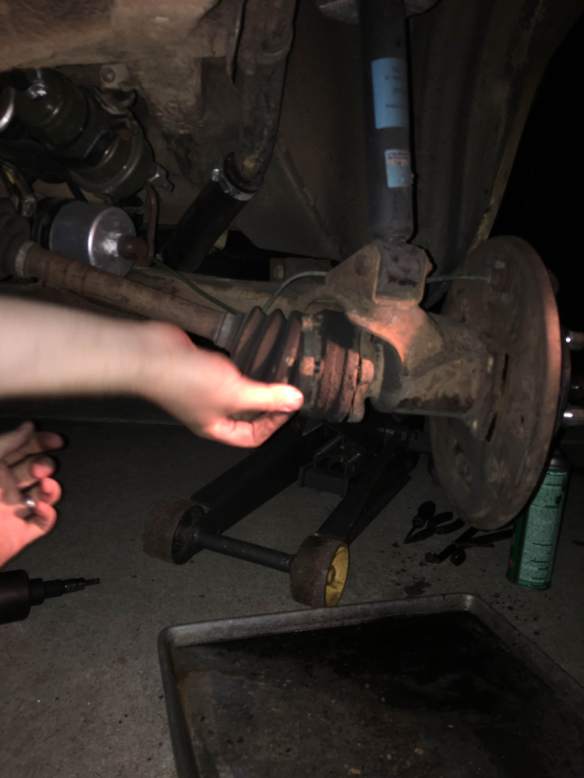
7. After that I removed the three bolts that attach the trailing arm (two 19mm to the front where it attaches to the chassis and one 17mm at the rear where it attaches to the rear shock. I pulled the semi-trailing arm out and inspected it. Then I cleaned it off with some simple green.

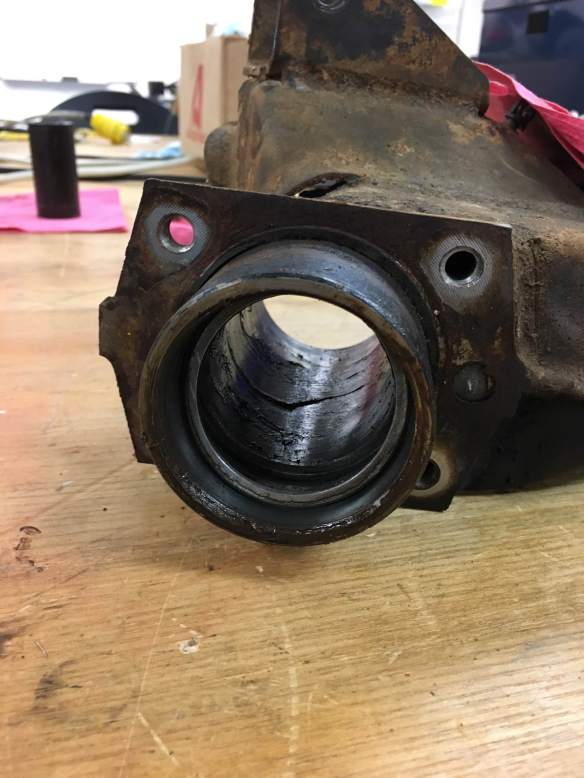
8. My outer wheel bearing had disintegrated. The cage had crumbled into pieces and the bearings were rolling around loosely inside the races. The inner race of the outer bearing just came out by hand and spilled ball bearings all over the ground. I removed the cylindrical spacer that sleeves around the splined axle between the bearings, wiped the old, brown grease off and set it aside.

9. The bearings butt up to a little shoulder on the inside of each side of the trailing arm. The races of the bearings sit up higher than the shoulder so I took a flat-ended metal punch and tapped the old inner bearing out. It came out pretty easily. On the outer bearing, all that was left on mine was the outer race but the outer bearing has a spacer between it and the shoulder inside the trailing arm that sticks up slightly higher than the shoulder but not as high as the race so I didn’t want to mar it up with the punch. Instead I used an appropriated-sized bearing press tool to drive that outer race out of there. The spacer came out with it intact and undamaged. I wiped all the old grease out of the trailing arm.

IMG_7746.JPG

3.jpg

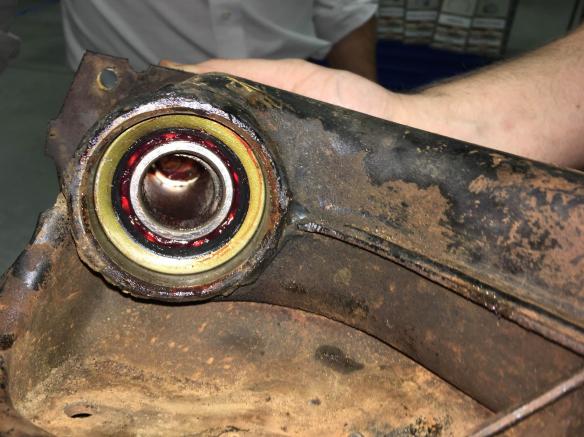
9a. I went ahead and replaced my trailing arm bushings while I had the arm out. I took a drill press and used a long circle-cutting bit to carefully cut the rubber around the old metal bushing centers. That weakened the bushing enough to where I was able to spin them and pull them out pretty easily. Then I took the new bushings, put a thin coat of petroleum jelly on them and drove them in with an arbor press. They went in easily and popped out the other side, seated correctly.

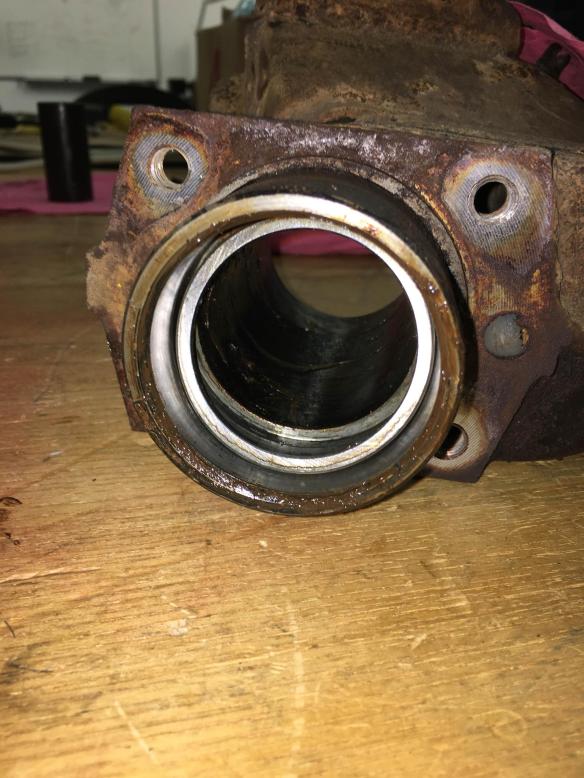
10. Next came the arbor press. I packed the new bearings by hand. I put a big glob of grease in my hand and squished the new bearing into it like dipping a chip into hummus until the grease squirted through the other side of the ball bearings. I did so all the way around the bearing and then I wiped the grease out of the middle of the bearing and then smoothed the grease around the bearing with my finger so that it looked like a nice, jelly-filled jewish wedding cookie. You want a nice, even layer of grease in between all the ball bearings–no air bubbles.

11. I inserted the inner bearing first. I had my friend hold the trailing arm in place on the press, put a circular bearing driver plate between the press and the bearing and carefully drove the bearing down until it made contact with the shoulder inside the trailing arm. You can feel if it’s in contact with the shoulder by sticking your finger in through the inner race of the bearing and feeling the inside of the bearing cavity. You’ll feel it when the bearing makes contact though because the arbor press will stop pressing.

12. Before I put the grease seal on, I packed a bit of extra grease into it. I figure it can only help and it won’t hurt anything. I carefully drove the new grease seal into place on top of it using the press and a suitably wide socket head. I had to be extra careful with the seal. It slipped in awkwardly at first and I had to take a hammer and gently tap it until it was straight and then drove it in the rest of the way until it made contact with the bearing.
4.jpg

13. I put the metal spacer sleeve into the space between the bearings. I just lined it up with the center as much as I could. You don’t have to be extra careful with it because there’s a slight space between it and the bearings so it moves around pretty freely inside the cavity. The thin layer of grease on its end edge is enough to pretty much hold it in place as long as you don’t yank the assembly around.

14. Next I did the same as in step 12 with the outside bearing, making sure to put in the metal spacer shim first, the bearing second. Do the same as the first. Press it in, supporting the outer race with a bearing press tool until it makes contact with the inside shoulder. I left the outside grease seal off until after I pressed-in the splined axle.

15. Driving in the splined axle is a bit more involved. The center bearing races will be supported by the metal spacer sleeve. The inner bearing’s outer race will be supported by the shoulder inside the trailing arm’s bearing cavity. The outer bearing’s outer race will need to be supported by a socket that is big enough and long enough to straddle the threaded end of the splined axle as it comes through the inner race while also supporting the outer race of the outer bearing so that driving the splined axle through doesn’t push the bearing away from its seat on the shoulder.

16. I put a thin layer of grease on the splined axle before I pressed it in. When properly supporting the bearings, the splined axle should press in relatively easy. Make sure the socket you use to support the outer bearing is long enough to let the splined axle come all the way through. You’ll feel when the splined axle makes contact with the inner bearing. It’ll stop pressing through. You’ll also be able to see that the dust cap is slightly concealed. It has a very finished look and you should be able to tell when you’ve driven it in properly. The threaded end of the splined axle should stick out of the center of the outer bearing by about three inches give or take an eighth of an inch or two.
5.jpg

17. Next I used the same socket as in step 16 to drive the new grease seal into place. I also packed this grease seal with extra grease.

18. Reassembled unit.

IMG_7755.JPG

19. Reassembly is the reverse of disassembly. I didn’t really torque anything to spec. I just tightened the three trailing arm bolts back into place as tight as I could. The big question for me was the castellated nut. I re-tightened it with the air impact wrench, then I put the hub and tire back on and I could wobble the tire laterally quite a bit, which was alarming. Then I took the tire and hub back off and, using a socket wrench, was able to tighten it a further 1/4 turn. Then I hit it again with the impact for good measure. When I reattached the hub and tire this time, the wheel was rock solid. No wobble at all. It drives great now but I’m paranoid about the driver’s side bearings now so I can’t enjoy it. I need to do that side too.

This was a very rewarding job and I want to do the other rear wheel now in the interest of uniformity.

Alternatively, Alternators

Abstract—This paper concerns the functional principles of automotive alternator systems.

INTRODUCTION

Automotive alternator or charging systems are made up of three components: the Alternator, which is essentially an AC generator, a Voltage regulator and a 12V Battery. This paper will explore this simple system particularly as it relates to a 1982 BMW 320i Coupe.

II.

Alternators work on the principle of electromagnetism laid down in what is probably one of the top three most important concepts in electrical engineering: Faraday’s Law. Faraday’s Law states simply that when a coiled conductor  is exposed to a moving magnetic field, a current is induced in the conductor. More accurately, an electromotive force is created, which induces a current in the conductor. The force produced by the movement of the magnetic field within the coil is amplified by the number of turns in the coil, signified by the variable (N). Faraday’s law is shown in figure 1.

Screen Shot 2015-08-19 at 4.25.47 PM

Fig. 1, Faraday’s Law (Lenz’s Law)

This formula at its most basic level, describes the process by which mechanical energy (work) can be converted into electricity. This is exactly what an alternator does. It converts the energy output from the burning of gasoline (or diesel) into electricity to keep the car’s 12V, battery-powered electrical system topped off.

III.

Typically, an automotive alternator should output enough voltage potential to keep a 12V car battery at a voltage of approximately 14V. Testing of the charging system of the 1982 BMW 320i Coupe used as an example in this paper with a DMM reveals that the 320i’s alternator “outputs” approximately 13.5V. This is a bit low but, as stated before, an alternator converts mechanical energy to electrical energy. This BMW has a slowly failing in-tank fuel pump and a worn-out distributor bearing. It is also possible that there could be a pinhole vacuum leak somewhere in the intake manifold boot, which is a 33+ year old rubber part. All these variables add up to less than optimal engine performance, which translates to less than optimal mechanical energy output, which further translates to less than optimal alternator output. The 320i’s voltage output is displayed in figure 2.

Screen Shot 2015-08-19 at 10.31.21 PM

Fig. 2, Charging output of a 1982 BMW 320i alternator

The voltage output of the 320i’s alternator increases when the throttle is opened (fuel is injected into the engine). This is consistent with how an alternator is expected to perform. Alternator current output is proportional to rotations per minute of the alternator pulley, which is controlled by the engine’s power output. The faster the car is going, the more current is produced by the alternator. This concept is exemplified by the chart in figure 3 below.

Screen Shot 2015-08-19 at 10.31.34 PM

Fig. 3, Alternator Output – Amps vs Engine RPM

This is why, if a battery is flat, it can be recharged by a long (hour or more) drive. As previously stated, an alternator is designed to simply top-off battery charge but, given enough time under normal running conditions, an alternator will generate enough power to fully recharge a 12V battery.

However, this scenario is by no means ideal. An alternator is not designed for fully recharging a battery. It can simply be used to do so. Optimally, a dedicated battery charger that plugs into the main grid should be used to recharge a flat battery.

IV.

An alternator is essentially an AC generator so it consists of an armature, a magnetic pole, a commutator and a rotor shaft. An automotive alternator also features an interior cooling fan to dissipate the heat generated by spinning and producing electricity as well as a voltage regulator that distributes and controls the amount of current produced by the alternator that goes to the battery. Figure 4 is an exploded-view diagram of a Bosch alternator similar to the one on the 1982 BMW 320i used as an example in this paper. 

Screen Shot 2015-08-19 at 10.31.49 PM

Fig. 4, Exploded-view Diagram of Bosch Alternator

The average alternator has five terminals. An S-terminal senses the battery voltage. The IG terminal is attached to the ignition switch that turns the voltage regulator on when the engine is cranked. Under nominal operating conditions, the L terminal closes the circuit to the battery warning light. The B terminal is the main alternator current output terminal, which is attached to the positive battery terminal. Finally, the F terminal is the full-field bypass for the regulator.

Batteries need a direct current. Because alternators are actually AC generators, they are fitted with a diode rectifier (or rectifier bridge) in order to convert the current before it gets sent to the battery.

V. CONCLUSION

Alternators produce an AC current that is rectified to DC and then sent off to charge the battery. The amount of voltage put on the battery is determined by a voltage regulator fitted to the alternator generator. The regulator determines when to deliver voltage and how much voltage is needed to be delivered to the battery.

Alternators are crucial automotive component that an engine will not run on its own without a properly functioning one.

When running, a car’s alternator should deliver a DC voltage of approximately 14V to the car’s battery. If this voltage is below the 14V threshold, it may be possible that the alternator is failing. In that case, it is advisable to immediately have the part replaced to avoid power loss while driving, which can be an incredibly dangerous scenario. It is also advisable for car owners to purchase name-brand alternators from quality parts makers like Bosch. Off-brand and discount alternators use low-quality parts to keep their overhead low and as a result, the inferior parts have a low lifespan. Buying quality parts will save money in the long run.

REFERENCES

HYPERPHYSICS. Faraday’s Law. [Online]. Available: http://hyperphysics.phy-astr.gsu.edu/hbase/electric/farlaw.html

MINEBEA. History of Brushless DC Motors. [Online]. Available: http://www.nmbtc.com/brushless-dc-motors/brushless-dc-motors/

OHIO ELECTRIC MOTORS INC. Permanent Magnet DC Motors. [Online]. Available: http://www.ohioelectricmotors.com/permanent-magnet-dc-motors-649

ALL STAR MAGNETICS. Neodymium Magnets. [Online]. Available: http://allstarmagnetics.com/index.php/neodymium_magnets

Fawwaz T. Ulaby, Eric Michielssen, Umberto Raioli, “Maxwell’s Equations for Time-Varying Fields,” in Fundamentals of Applied Electromagnetics, 6th ed. Prentice Hall Publishing

Nikola Tesla, “My Later Endeavors,” in My Inventions – The Autobiography of Nikola Tesla, New York, 1919

Gordon Tobias S.A.E., “Engine and Engine Overhall,” in Chilton BMW Coupes and Sedans 1970-88 Repair Manual, 1996, Haynes North America Inc.

The History and Principles of DC Machines

Abstract—This paper concerns the history and development of the modern DC electric generator and the scientific principles upon which electric machines are built.

INTRODUCTION

IT  was in the year 1831 that British scientist Michael Faraday discovered the principles of what we now call “induction.” He discovered that by coiling a  conductor around a ferrous ring and inserting a magnet into the center “donut hole” of the ring, he could induce a current in the coiled conductor. Faraday explained his discovery with a what he conceptualized as “lines of force,” which are demonstrably observable when a magnet is placed amidst a smattering of iron shavings as pictured in figure 1, but he was unable to express the idea in the scientific lingua franca of mathematics so his ideas were largely ignored by his peers. 

Screen Shot 2015-08-19 at 4.24.44 PM

Fig. 1, Magnetic Field Lines

That is, until 1861, when a young mathematician and physicist named James Maxwell came onto the scene and published his paper, “On Physical Lines of Force.” In the paper, Maxwell provided the mathematical “bricks” to flesh-out Faraday’s concept of induction. As indicated in figure 2, Maxwell’s “Faraday’s Law” states that an electromagnetic force (Vemf) is induced due to a change in magnetic flux (φ) over time, multiplied by the number of turns (N) in a conductive coil.

Screen Shot 2015-08-19 at 4.25.47 PM

Fig. 2 Faraday’s Law (More accurately Lenz’s Law)

The negative sign preceding number of turns (N) in Faraday’s law actually comes from Lenz’s Law, which came years after Faraday’s death. Lenz discovered that the direction of the induced EMF will oppose the change in magnetic flux. Before that, Faraday’s law simply stated that induced EMF would be equal to the change in flux over time. Lenz’s Law makes Faraday more accurate.

Faraday’s Law is an extremely important concept because it quantifies how mechanical energy can be converted into electricity. In the most basic terms, this is the entire concept behind the electric age that has afforded and allowed for the plush society humanity takes for granted today.

This paper will explore these concepts as well as the series of events that led to the electric-machine-powered world humanity lives in today.

II.

One of the, if not the first machines to take advantage of the concept of induction was, not surprisingly, conceived by Michael Faraday himself. Faraday invented a precursor to what is now known as a disc-rotor DC generator or “Dynamo.” He called his machine the “homopolar generator” (pictured in figure 3). Others dubbed it the “Faraday Disc” in the titular scientist’s honor. The Faraday Disc was essentially a hand-crank that spun a conductive disc through a horseshoe-shaped magnet. The movement of the disc between the poles of the magnet induced a current in the disc that traveled or radiated from its center to its edge, where it was then transferred through a spring-brush and redirected back into the disc’s center through its axle shaft.

Screen Shot 2015-08-19 at 4.26.03 PM

Fig. 3, Faraday Disc

Faraday’s invention was inefficient to put it nicely and was only capable of inducing low voltages. Others during the 1820s to 1850s also experimented with electric generator technology and Dynamo technology made stumbling, slow progress. The machines coming out on the market at that time were being called “magneto-electric machines.” These “magneto” machines utilized permanent magnets to produce electricity. Because of the amount of magnetic material needed, these machines weighed upwards of 4400 pounds (2.2 tons) and produced approximately 700W. Taking into account the fact that these machines weighed way too much to be practical and would quickly lose their magnetism after extended use made electricity good for only small-scale technologies like electro-plating and telegraph operation. Then, in 1866, the production of electricity was revolutionized by a German engineer named Werner Siemens (the father of electrical engineering if you ask a Deutschmann). 

Screen Shot 2015-08-19 at 4.26.21 PM

Fig. 4, Siemens Double-T Armature

Siemens took a design aspect from an earlier invention of his, the widely-lauded pointer telegraph, and applied it to the question of how to produce higher rotation speeds and stronger magnetic fields for generators. He proceeded to connect his double-T armature, pictured in figure 4, in series with an electromagnet, instead of the traditional permanent magnet. It was in this way that he created a self-excited generator or a generator in which the magnetic field of its two main poles are excited by a current emanating from the coil within its own armature.

Self-excited or self-induction allows for the initial current in the field-winding of a generator to be induced by the natural or remnant electromotive force that resides in its own electromagnet. Basically, it could start itself with its own residual magnetism.

Siemens’ dynamo machine succeeded in decreasing “the weight of the drive unit by 85 percent, the necessary drive power by about 35 percent and the price of the machine by 75 percent while maintaining the same power.” The age of the electric dynamo was upon the world.

In 1867, Siemens submitted a paper titled “On the transformation of mechanical energy into electric current without the application of permanent magnets,” to the Prussian Academy of Sciences, which brought his discovery into the zeitgeist.

III.

Siemens’ brush DC generator, based on the dynamo electric principle, ushered in a new era of inexpensive electric power, paving the way for worldwide industrialization.

The only real technological advance to build upon Siemens’ double-T armature DC motor for almost another 100 years came in 1891, 25 years after Siemens published his paper. An American inventor and electrical engineer, Harry Ward Leonard, devised a system, using a rheostat (simple resistance control), to control the speed of a DC generator, thus allowing for complete control of a DC system. Leonard’s system, dubbed simply as the “Ward Leonard Motor Control System,” stayed more or less the same and was widely used worldwide until the mid 1960s. Many elevators, in particular, were powered by Ward Leonard drives even up until the 1980s when electronic control systems utilizing transistor technology came onto the scene.

IV.

In 1982, General Motors in conjunction with Sumitomo Special Metals discovered the revolutionary  melt-spun Nd2Fe14B compound, which drastically cut the cost of high-strength, rare-Earth magnets. Rare-Earth magnets are so ubiquitous now that anyone can purchase them in bulk at a low price from the neighborhood hardware store.

Modern permanent magnet DC motors represent a throwback to the foundations of DC electric power generation. However, the new magnet technology has further cut the weight and size as well as boosted the

Screen Shot 2015-08-19 at 4.26.33 PM

Fig. 5, DC Brushed Generator

efficiency of DC motors’ modern descendants.

Modern DC motors come in two varieties now: brushed/commutator and brushless. Older designs incorporating the brushed/commutator variety of DC motors operate on the principle of a rotating armature. That is, the armature spins inside of an electromagnetic pole and transfers the current induced inside of it through a  set of commutator rings with brushes mounted on them. The generator load is mounted between the terminals leads of these brushes.

Brushless versions of the DC motor operate on the  entirely opposite principle. In brushless versions, the armature is static and externally commutated by an electronic control while the permanent magnet, magnetic pole rotates around it. This configuration negates the need for the constant maintenance that carbon brushes and commutators demand. However, like everything there is a downside to the new, permanent magnet, externally commutated DC motors. The neodymium compound used in modern rare-Earth magnets is highly susceptible to corrosion. This has necessitated the development of corrosion-resistant coatings, which work well in alleviating wear.

V. CONCLUSION

The history and development of DC motors and generators is a fascinating look into the ingenuity and genius of humanity. In just under 30 years, hairless apes that had, for the previous 250,000 years, huddled next to firelight to combat the terrors of the night developed a technology that enabled the advent of a global industrial complex, which paved the way for technological miracles and an age of abundance, the likes of which had never before been witnessed or enjoyed by any man, king or slave, in mankind’s history.

The trend in DC machine evolution seems to be towards brushless configurations and perfecting efficiency using more accurate, electronic torque and current control. Advances in the snowballing field of materials sciences are sure to contribute to the progression.

REFERENCES

KARLSRUHE INSTITUTE OF TECHNOLOGY.  The invention of the electric motor 1856-1893. [Online]. Available: http://www.eti.kit.edu/english/1390.php

SIEMENS. Werner Von Siemens (1816-1892). [Online]. Available: https://www.siemens.com/history/pool/perseunlichkeiten/gruendergeneration/werner_von_siemens_en.pdf

DEUTSCHES MUSEUM. The development of electric power. [Online]. Available: http://www.deutsches-museum.de/en/exhibitions/energy/electric-power/history/

SIEMENS. In Focus, January 17, 1867 – Fundamental report on dynamoelectric principles before Prussian Academy of Sciences. [Online]. Available: https://www.siemens.com/history/en/news/1057_dynamoelectric_principles.htm

HYPERPHYSICS. Faraday’s Law. [Online]. Available: http://hyperphysics.phy-astr.gsu.edu/hbase/electric/farlaw.html

ENCYCLOPEDIA BRITANNICA. Werner von Siemens German Electrical Engineer. [Online]. Available: https://www.britannica.com/biography/Werner-von-Siemens

ENCYCLOPEDIA BRITANNICA. Self-excited generator – dynamo. [Online]. Available: https://www.britannica.com/technology/self-excited-generator

ENCYCLOPEDIA2 THE FREE DICTIONARY. Self-Excitation of Generators. [Online]. Available: http://encyclopedia2.thefreedictionary.com/Self-Excitation+of+Generators

MINEBEA. History of Brushless DC Motors. [Online]. Available: http://www.nmbtc.com/brushless-dc-motors/brushless-dc-motors/

OHIO ELECTRIC MOTORS INC. Permanent Magnet DC Motors. [Online]. Available: http://www.ohioelectricmotors.com/permanent-magnet-dc-motors-649

ALL STAR MAGNETICS. Neodymium Magnets. [Online]. Available: http://allstarmagnetics.com/index.php/neodymium_magnets

Fawwaz T. Ulaby, Eric Michielssen, Umberto Raioli, “Maxwell’s Equations for Time-Varying Fields,” in Fundamentals of Applied Electromagnetics, 6th ed. Prentice Hall Publishing

Nikola Tesla, “My Later Endeavors,” in My Inventions – The Autobiography of Nikola Tesla, New York, 1919

Werner von Siemens, “Direct Measurement of the Resistance of Galvanic Batteries,” Scientific & Technical Papers of Werner Von Siemens, Volume 1, London, 1892

What I Know About Wells

Recently my tenant called me saying he was not getting any water. That’s a pretty serious problem so I jumped into action to investigate. My rental house is supplied with water from a private well so my first thought was that a pipe had burst. It turned out I was right.

But in the lead up to going down and fixing the problem in person (and before I actually knew for sure that a burst pipe was the problem) I had to re-acquaint myself with the ins and outs of well technology.

Wells are pretty simple but if you don’t know a few key things they can be infuriating and mind boggling.

Fundamentally, a well is a hole in the ground that’s drilled deep enough to tap into the ground water. Luckily we’ve moved past the cartoon-style well we’ve all seen with the crank and bucket. Today’s wells feature a long pipe (sometimes as long as 200 feet) that goes down into the hole just like the straw you insert into the top of your Big Gulp Slurpee. That’s how the water gets sucked up!

On the end of that pipe is a thing called a “foot valve,” for obvious reasons. Foot valves look like this: 11551-1

It’s basically a strainer with a little spring-loaded valve inside of it that opens up when the water pressure weighing down on it from above lets up as it’s being sucked through the pipe by the pump.

Next is the pump. A lot of residential wells have an in-ground pump. Here’s a great, sort of unintentionally funny DIY video of a guy replacing one of those: YouTube

Mine, however, is an above-ground pump. A pump is basically just a little engine that sucks the water out of the ground and pushes it through the house’s pipes. Simple enough right?

Well there’s a couple things to know about the pump. When all the faucets are off, a water-well system is a pressurized, closed system. The pump has a pressure switch on it that cuts on and cuts off at certain, pre-set points. For instance, when you’re up in the house taking a 45-minute shower you are using up all the water in the pipes. At the same time, the pressure in those pipes is being released through your shower head.

The pressure switch senses this drop in pressure when it gets low enough and switches the pump on, which pumps water into the pipes to make up the difference so that you never run out of water. Usually this low-pressure mark is set at around 30 psi. That’s pretty standard. The high or cut-off point is usually around 60 psi. Those settings can be changed by loosening or tightening the two nuts inside the pressure switch casing. In addition, the pressure switch is where the electricity hooks into the well system to power the pump.

Here’s a standard pressure switch with the casing pulled off showing the inner workings as well as a handy diagram for remembering which nut does what and how the electrical connections are wired:images-1 images

But wait, there’s more! A water well system also has a pressure tank attached between the pump and the house. Obviously a house’s water pipes contain a relatively small amount of volume and as such can’t contain a huge reservoir of pressure. So without some reservoir of pressure as backup, the well pump would turn on every time someone turned on a faucet for more than a few seconds in order to maintain pressure in the system.

The pressure tank looks like a big propane tank but on the inside it contains what is essentially an inner-tube. Approximately the top 2/3 of the tank is comprised of this inner-tube, which is filled with pressurized air at approximately 1-3 psi lower than the cut-off pressure. So for most systems, approximately 27-29 psi.  The lower portion of the tank is filled with water. So when trouble-shooting a well for problems, an easy way to test whether or not the tank’s inner-tube has burst is to simply tap the side of the tank with your knuckle. If the tank is in good, working condition, the top should sound like a high-pitched ping when it is tapped because there is nothing but air inside of it while the bottom 1/3 should make a deeper sound because it’s filled with water.

The pressure in a well pressure tank can be tested with a simple car tire pressure meter. If it’s low simply top it off with an air compressor or electric tire pump. Bicycle pumps are a bad idea.

As far as plumbing (pipes) go, cpvc is super easy to use. It’s like putting legos together. Metal water piping is probably hardier but it’s a pain in the neck to get cut and then you have to get every end threaded and if you messed up in measuring it’s a huge hassle and way more expensive. Cpvc is easy to cut (with a pvc pipe cutter tool). Simply glue it together with the one-step pipe glue found in every home improvement store in the nation and let it sit overnight.

First steps when troubleshooting a well that no longer pumps water:

1. Inspect the pipes. If it’s winter and your water suddenly cuts off, it’s probably a burst pipe.

2. Check the circuit breaker. Turn it off and turn it back on. (If it immediately clicks back off, leave it off and call someone who knows about electricity because something is wrong electrically. Don’t risk getting zapped. With the amount of current it takes to power these well pump systems it could be fatal.)

3. Check the Pressure Switch. Turn the valve going to the house off to isolate the pump system and open another valve to drain the pump. The pressure switch should cut on when the pressure gauge reaches the cut-on pressure. If it doesn’t, the switch may be blown. If it’s blown, replace it!

4. Check the Pressure Tank. Tank pressure should be 2-3 psi lower than the pressure switch cut-on pressure.

Also, a country realtor once told me that when you move into a place with a well it’s prudent to dump a gallon of bleach into the well, let it sit for a few hours and then run the water off at the house until the bleach smell goes away. This is to clean any nasty bacteria out of your pipes. (Although I think a carbon filtration system is probably a healthier and tastier option).

That’s basically it. Have fun and be well!

Viking/Celtic Knit Hat

I want a wool knit cap, slightly pointed at the top, slightly curved at the bottom to better cover the ears.

I want it to be lined with thinsulate and have a little “stash” pocket inside for hiding a money bill or an ID. The pocket could have a button or maybe a velcro strip or something although I’d want it to be a very weak velcro–and fasteners might get lumpy and uncomfortable so maybe just an open-top pocket would be fine as long as it was deep enough for an ID card.

I tried posting this idea to Reddit /r/KnitRequest but I’ve had zero interest in the project. Reddit is always hit or miss anyway. I guess I’ll try to find a knitter on Etsy next.

I’d like the knit pattern to be a viking or celtic-themed pattern.

I’ve attached a pinterest board with lots of inspiration for this project: Wotanstag

And here’s a drawing I made of what I want (although it’s a rough sketch and I would leave the pattern up to discussion–pro-knitters are probably way more knowledgable and creative in that department than I am. It might even be cool to have an inset of Thor’s hammer or something knit into it–that would be awesome actually):

Knit Viking Cap

I think the cap should be Earth-toned. I was thinking maybe an olive wool yarn with muted flecks of other colors in it–if that exists. But I’d also be open to a burnt sienna like one of the caps featured in the pinterest board or black or gray–Color is kind of open haha.

I definitely want wool and I’d like it to be slightly elastic I think. I want this cap to be wearable on the slopes as well as normal every day wear.

My head is 23.25″ diameter. From ear lobe bottom to ear lobe bottom over the crown of my head is 17.5″.

“I have a dream! And this knit viking cap is my dream!” Knitters are awesome.

EDIT:

Here is the message I’ve been sending Etsy knitters:

Hello!

I am hoping my ridiculous request is doable.

I would like a wool knit cap, slightly pointed at the top, slightly curved at the bottom to better cover the ears.

I want it to be lined with thinsulate and have a little “stash” pocket inside for hiding a dollar bill or an ID. The pocket could have a button or maybe a velcro strip or something although I’d want it to be a very weak velcro–and fasteners might get lumpy and uncomfortable so maybe just an open-top pocket would be fine as long as it was deep enough for an ID card.

I’d like the knit pattern to be a viking or celtic-themed pattern. The Celtic cable pattern is excellent.

I’ve attached a pinterest board with lots of inspiration for this project:www.pinterest.com/lukeprater/wotanstag/

And I’ve also attached a drawing I made of what I want (although it’s a rough sketch and I would leave the pattern up to discussion—pro-knitters like yourself are probably way more knowledgable and creative in that department than I am.

One detail I would like to have is an inset of Thor’s hammer knit into the brim so that it shows when I’m wearing the hat–(If that’s possible that would be awesome actually): There’s plenty of examples of the traditional Thor’s hammer on the pinterest board I linked to.

I think the cap should be Earth-toned. I was thinking maybe an olive wool yarn with muted flecks of other colors in it–if that exists. But I’d also be open to a burnt sienna like one of the caps featured in the pinterest board or black or gray–Color is kind of open haha. If you decide you can do this project I will decide on a color.

I definitely want wool and I’d like it to be slightly elastic I think–I don’t know if that’s just a natural byproduct of knitting. I assume it is. I want this cap to be wearable on the slopes as well as normal every day wear.

My head is 23.25″ diameter. From ear lobe bottom to ear lobe bottom over the crown of my head is 17.5″.

Thoughts? Price estimate?

Thanks, can’t wait to hear back from you.

-Luke

***EDIT: I achieved success! Behold the glory of my viking beanie…

Good Job!

I started a zombie story. It’s fairly generic but the idea is to write a story kind of like “The Martian” by Andy Weir but with zombies.

Twelve days. That’s all it had taken for the Holschcomb-B virus to sweep across every continent on the globe. Future historians would call the two and a half years that followed, “The Desecration,” but for those of us who lived through it, it was just life. Within those first 12 days, every city on Earth had been violently overrun by H-B victims.

The virus had been airborne. No one knew for sure where it had come from—of course, there were rumors: the Russians made it in a lab and then unleashed it or maybe it was the Americans or maybe it had come from space or been unlocked from prehistoric Arctic ice. Nobody really knew and anyone who did was probably either dead or worse, dead-alive. That’s what H-B did to its victims. There was no “incubation” period like a normal influenza. You could be having an espresso and reading the Wall Street Journal at the local cafe, perhaps brushing a bit of fluff off the shoulder of your suit jacket one minute and the next minute dead in a pool of your own fluids—one blood vessel in the left eye ruptured. It was the same every time. What came next, of course, is what no one was prepared for.

By all accounts, the first wave of the epidemic had hit New York City, Paris, Beijing, Mumbai and Sydney simultaneously. Suddenly millions had just dropped dead all over the world, their lifeless bodies oozing blood from every orifice. Everyone who remained, we later learned, had either been immune or just plain lucky. The initial shock of what had happened to friends and loved ones all over the planet had only lasted five minutes—that’s approximately how long it takes for H-B to revive its host body. When the dead began to reanimate no one knew what was going on. Relief at the sudden, miraculous recovery of millions of people turned to pure, unadulterated horror.

In those first, few seconds, the living tried reasoning with them. But within hours, every city named in the initial outbreak was thrumming with rabid, sprinting, roaring hordes of reanimated cannibal monsters. Monsters with the faces of mothers, fathers, friends, co-workers.

Armies and national guard were quickly overrun. The dead far outnumbered the living. Moscow, London, Tokyo, Jerusalem, Atlanta and Los Angeles were all nuked. The rest of the Earth’s cities simply went dark.

The precious few who remained alive, really alive, around the globe hunkered down for the worst two and a half years of their lives. Those first six months had been the worst—at least for me. I was alone the whole time. Be me, a 22-year-old fifth-year engineering student. I was on my way home for fall break when traffic came to a standstill and the horde spilled out onto the freeway like Noah’s flood cracking-open people’s cars like clamshells and mauling people to death.

When I recall those first moments I can’t remember details. I can’t remember how I made it off the freeway. I can’t recall thinking that I should probably take my tool kit with me. Somehow I knew what was going on when I saw them spilling out onto the road. Somehow I managed to pack up exactly what I would need in those first dark days. I don’t know, when I think about it I am dumbstruck. Maybe in moments of extreme terror, some people can think more clearly than others. Maybe I had a guardian angel. I can’t explain it. Knowing everything I know now, I believe it was a miracle that I even made it off that freeway that day.

My first clear memory from that time starts in the woods. I hiked for an entire day running from every sound I heard. Eventually I made it to a house. “Compound” is the better word. It was a 30-acre white-tailed deer farm completely fenced in on all sides by 16-foot chain-linked fence. Luckily there wasn’t any razor wire. When I climbed over the fence I found four out-buildings and a main house. It was one of those places owned by an old Vietnam vet prepper hermit, full of tools, weapons, equipped with diesel generators, ATVs, MREs—the works. I found the old vet rabidly clambering up at me from inside a mechanic bay he had under one of the out-buildings. He must have been under there working on one of his vehicles when the epidemic hit. I kept him “alive” down there for about two weeks before I could finally bring myself to put him out of his misery. The old bastard growled and gnashed his rotten teeth at me with the energy of a rabid Robin Williams right up until I blew a hole through his brain with one of the pistols he’d kept in the house.

In those early times I didn’t even know if there were other living people out there in the world, much less what caused the zombie plague. So I did the only sensible thing: I burned the old bastard’s body.

For the first few days after the epidemic hit, television signals were still being broadcast. On the third day, when I saw that they had nuked Atlanta, I knew my parents were gone so after coming to terms with the fact that I was now alone in the world I realized that the compound was mine and I’d better get to work surviving.

I set to work putting the place into some semblance of order that made sense to me. After the first few zombies wandered onto the property and mauled three of my deer I realized I would have to start patrolling the perimeter every day to inspect the fence and ensure my security.

The old bastard who had owned the place before me had been an avid reader so I had quite the library of science fiction, murder mysteries and of course, survival books to read—and all the time in the world to read them.

I learned how to garden, hunt, butcher and preserve meat. The old bastard had even left me a hen house complete with hens and fresh eggs! I lived that way for about four months before I found the old bastard’s secret workshop beneath the pantry in the farm house.

I had seen the radio antenna on the back side of the property while inspecting the fence after the first zombie incursion but I didn’t put two and two together until the fourth month. I was walking around the house reading a book on making soap when I went into the pantry to grab a can of punjabi (a delicious calorie-dense Indian mush) to make a few meals with. I had some rabbit meat I’d snared that I wanted to mix it with. Anyway, since I was reading I absent-mindedly reached for the can and knocked it off the shelf. The hollow sound it made when it hit the floor instantly notified me that there was a space underneath.

I pulled back the rug and found a door, under which, was a ladder leading down into a small room packed with electronic equipment—none of which was on. I recognized the ham-radio equipment instantly. That’s where this story starts.

WARM-WEATHER BACKPACKING CHECKLIST

Image

Checklist

For the last three or four years, I’ve been joining a group of friends to go camping and hiking over a long weekend on various trails and in various state and national parks around the Southeast. We usually hike around 15-20 miles over the course of each excursion and carry our gear with us as we go.

We’ve done a good job of getting a trip together right at about every six months or so, which is frequent enough for me to have put some thought into how to optimally prepare for each hike.
One thing I’ve learned is that being in deep woods without the right gear is just the pitts, so I started a camping/hiking checklist about three trips back to avoid those inevitable packing and memory gaffes that we’re all prone to.
I’ve crafted it into what I think is a pretty definitive list and I’d like to share it with the Internets so that others may benefit from my experience.
*When packing for a “long-distance” backpacking trip, keep in mind that the lighter your pack is, the better–so when you pack your supplies, you should gauge how much of each item you bring based on need and duration of your trip. Over-packing adds unnecessary ounces and unnecessary ounces add up to unnecessary pounds. And Unnecessary pounds strain your joints, chafe your shoulders and make your feet ache.
With that in mind, enjoy!

I Survived The Apocalypse T-Shirt!

I Survived The Apocalypse T-Shirt!I had a dream and that dream was to create a t-shirt to commemorate my triumph in surviving through the end of the 13th Mayan Baktun. We have entered into a new age of enlightenment–taken the first step into the next 5,000-year epoch and you should celebrate with me by buying the shirt that commemorates our triumphant survival. My beautiful girlfriend, Sophia helped me realize my dream by building a website from scratch, which you can reach by clicking here! She also recruited world-renowned designer Stewart Scott-Curran, who has worked on impressive projects at Coca-Cola, Nike, Umbro, CNN, the World Cup and many others. Buy the shirt that proves you survived. Only $12.21 (get it?) plus shipping! Buy today! Yeah!

Apocalypse Tee 2012!Apocalypse Tee 2012!

Buy the shirt! Click this text or copy&paste http://www.apocalypsetee2012.com into your URL bar!

Synchronicity

Zombies be runnin’

The World English Dictionary defines Synchronicity as “an apparently meaningful coincidence in time of two or more similar or identical events that are causally unrelated” and Wikipedia defines it as “the experience of two or more events that are apparently causally unrelated or unlikely to occur together by chance, yet are experienced as occurring together in a meaningful manner.”

I like the Wikipedia definition better.

I experience synchronicity on a weekly basis. I am agnostic–I don’t think any one you hairless apes out there knows jack about the universe or the nature of reality. I’ll be the first to admit I certainly don’t. I think probably there is no god but I think the certainty of A-theists is just as ill-conceived as the “faith” of their religious counterparts. Definitely all the major religions are dead wrong–which is hilarious by the way. But synchronicity provides that itch in the back of my head that makes me sure there’s more to reality than meets the eye.

Last Sunday I experienced a weird episode of synchronicity. I had flown down to Fort Lauderdale with my girlfriend Sophia the previous Thursday but we had separate flights back to Atlanta on Sunday. She left Ft. Lauderdale before me and made it home before I had even boarded. I had my laptop with me so I spent the three hours until my flight sitting in the terminal watching episodes of “The Walking Dead” on Netflix via wi-fi (wee-fee as they call it in Mexico).

When I got back to Atlanta it was about 2:50pm. I disembarked and walked through the terminals down to the Marta train. As I walked I thought about the walking dead episodes I had watched and engaged in a little speculation about what I would do should the zombie apocalypse hit my town–this is an important subject. One must have a plan.

While walking I passed a little shop that had a rack of hats–ATL baseball caps–prominently displayed in the doorway and I thought to myself, “self, what hat would you wear during the zombie apocalypse?”

Obviously the answer is “an Indiana Jones hat.” Of course an Indiana Jones hat. In the next few seconds I ran through a couple more zombie apocalypse scenarios–how would I get to my family–how would I get out of the city–would we go to Sophia’s parents or mine? They live on a mountain but my dad’s place is fenced–I stepped onto the escalator going down into the superbly-named “plane train” subway line beneath the airport.

Two seconds later on the escalator a random stranger about ten feet ahead of me

Image

started whistling the Indiana Jones theme song out of nowhere. He whistled all the way through the first verse of the theme song and stopped. And then–if it wasn’t a weird enough coincidence already–he turned around and looked me right in the eyes and grinned a big, toothy grin. I hadn’t said anything to this guy and I hadn’t said anything out loud about the hat thing.

I grinned back and gave him a nod. What else do you do?