
Recently my tenant called me saying he was not getting any water. That’s a pretty serious problem so I jumped into action to investigate. My rental house is supplied with water from a private well so my first thought was that a pipe had burst. It turned out I was right.
But in the lead up to going down and fixing the problem in person (and before I actually knew for sure that a burst pipe was the problem) I had to re-acquaint myself with the ins and outs of well technology.
Wells are pretty simple but if you don’t know a few key things they can be infuriating and mind boggling.
Fundamentally, a well is a hole in the ground that’s drilled deep enough to tap into the ground water. Luckily we’ve moved past the cartoon-style well we’ve all seen with the crank and bucket. Today’s wells feature a long pipe (sometimes as long as 200 feet) that goes down into the hole just like the straw you insert into the top of your Big Gulp Slurpee. That’s how the water gets sucked up!
On the end of that pipe is a thing called a “foot valve,” for obvious reasons. Foot valves look like this: 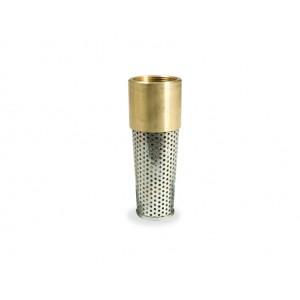
It’s basically a strainer with a little spring-loaded valve inside of it that opens up when the water pressure weighing down on it from above lets up as it’s being sucked through the pipe by the pump.
Next is the pump. A lot of residential wells have an in-ground pump. Here’s a great, sort of unintentionally funny DIY video of a guy replacing one of those: YouTube
Mine, however, is an above-ground pump. A pump is basically just a little engine that sucks the water out of the ground and pushes it through the house’s pipes. Simple enough right?
Well there’s a couple things to know about the pump. When all the faucets are off, a water-well system is a pressurized, closed system. The pump has a pressure switch on it that cuts on and cuts off at certain, pre-set points. For instance, when you’re up in the house taking a 45-minute shower you are using up all the water in the pipes. At the same time, the pressure in those pipes is being released through your shower head.
The pressure switch senses this drop in pressure when it gets low enough and switches the pump on, which pumps water into the pipes to make up the difference so that you never run out of water. Usually this low-pressure mark is set at around 30 psi. That’s pretty standard. The high or cut-off point is usually around 60 psi. Those settings can be changed by loosening or tightening the two nuts inside the pressure switch casing. In addition, the pressure switch is where the electricity hooks into the well system to power the pump.
Here’s a standard pressure switch with the casing pulled off showing the inner workings as well as a handy diagram for remembering which nut does what and how the electrical connections are wired:

But wait, there’s more! A water well system also has a pressure tank attached between the pump and the house. Obviously a house’s water pipes contain a relatively small amount of volume and as such can’t contain a huge reservoir of pressure. So without some reservoir of pressure as backup, the well pump would turn on every time someone turned on a faucet for more than a few seconds in order to maintain pressure in the system.
The pressure tank looks like a big propane tank but on the inside it contains what is essentially an inner-tube. Approximately the top 2/3 of the tank is comprised of this inner-tube, which is filled with pressurized air at approximately 1-3 psi lower than the cut-off pressure. So for most systems, approximately 27-29 psi. The lower portion of the tank is filled with water. So when trouble-shooting a well for problems, an easy way to test whether or not the tank’s inner-tube has burst is to simply tap the side of the tank with your knuckle. If the tank is in good, working condition, the top should sound like a high-pitched ping when it is tapped because there is nothing but air inside of it while the bottom 1/3 should make a deeper sound because it’s filled with water.
The pressure in a well pressure tank can be tested with a simple car tire pressure meter. If it’s low simply top it off with an air compressor or electric tire pump. Bicycle pumps are a bad idea.
As far as plumbing (pipes) go, cpvc is super easy to use. It’s like putting legos together. Metal water piping is probably hardier but it’s a pain in the neck to get cut and then you have to get every end threaded and if you messed up in measuring it’s a huge hassle and way more expensive. Cpvc is easy to cut (with a pvc pipe cutter tool). Simply glue it together with the one-step pipe glue found in every home improvement store in the nation and let it sit overnight.
First steps when troubleshooting a well that no longer pumps water:
1. Inspect the pipes. If it’s winter and your water suddenly cuts off, it’s probably a burst pipe.
2. Check the circuit breaker. Turn it off and turn it back on. (If it immediately clicks back off, leave it off and call someone who knows about electricity because something is wrong electrically. Don’t risk getting zapped. With the amount of current it takes to power these well pump systems it could be fatal.)
3. Check the Pressure Switch. Turn the valve going to the house off to isolate the pump system and open another valve to drain the pump. The pressure switch should cut on when the pressure gauge reaches the cut-on pressure. If it doesn’t, the switch may be blown. If it’s blown, replace it!
4. Check the Pressure Tank. Tank pressure should be 2-3 psi lower than the pressure switch cut-on pressure.
Also, a country realtor once told me that when you move into a place with a well it’s prudent to dump a gallon of bleach into the well, let it sit for a few hours and then run the water off at the house until the bleach smell goes away. This is to clean any nasty bacteria out of your pipes. (Although I think a carbon filtration system is probably a healthier and tastier option).
That’s basically it. Have fun and be well!
